Variation 5: Spiral Trellis
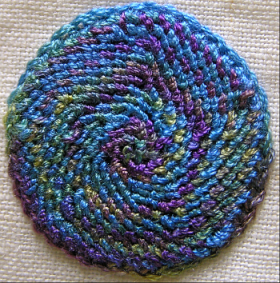
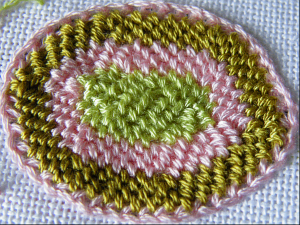
Spiral Trellis can be worked either with knotty trellis, like Version 2, which makes spiral ridges, or with smooth trellis, which has a flatter surface. The multicoloured circle below is knotty spiral trellis. (My very first attempt at spiral trellis.) This uses two strands of Stef Francis Superfine Silk on fine linen.
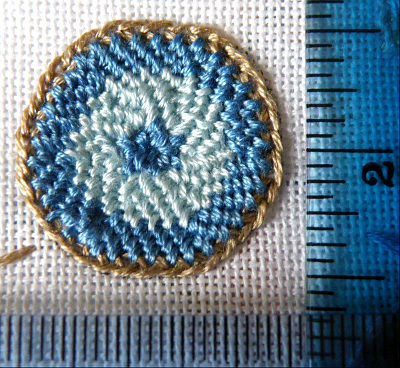
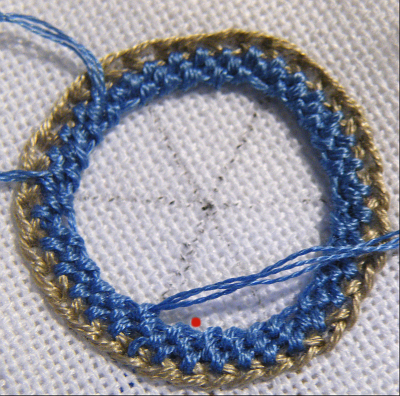
The sample is a circle worked in smooth spiral trellis. (The circle on the sampler at the top of the Trellis Stitch Family main page is also smooth spiral trellis.) At the bottom of this page there’s an oval shape filled with the same variation – I’d got bored with doing circles. You are advised to begin with a circle, it is the easiest shape to fill. I’ll talk about filling other shapes later.
The samples below and the one at the top of the main page are worked on 28 count fabric, with three strands of stranded cotton, the same materials as for verisons 1 to 4. It’s not essential to use evenweave fabric for this sample, as we’re not counting threads. But be warned: we will be counting stitches!
Many books say to begin spiral trellis at the middle and work outwards. Unless you are working it as a totally detached piece of needlelace, I would advise you to ignore the books. Start at the outer edge and work inwards. It’s a great deal easier.
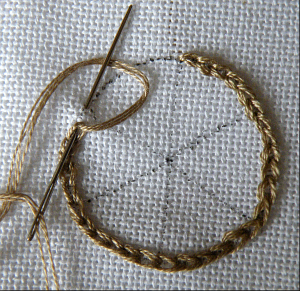
To start, you need to draw a circle on your fabric. For the sample make the circle 2.5cm (1 inch) in diameter. Mark the centre and six sectors if you can, like this:
Begin by working a circle of chain stitch on the drawn line. You will need to space them by eye. You need neat, even chain stitch to space your first row of stitches properly. Work six stitches in each sector, making 36 stitches in total. (In the step by step photos, the circle is larger than 2.5cm so that I can show the work clearly, your stitches will be slightly closer together.)
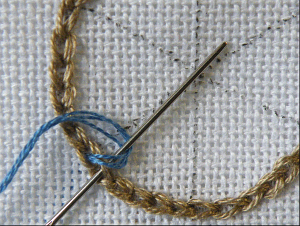 To start the first round of trellis, bring the thread through any chain that is at the start of a sector, and make the first smooth trellis stitch into the next chain. Work the trellis stitches just like row one of Version 3 and Version 4.
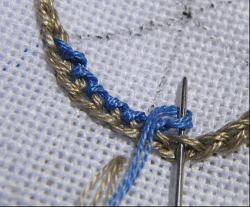 I’m going around the circle anti-clockwise, working the stitch left to right, but if you prefer to go anti-clockwise, that’s fine. (The difference shows up mainly when you’re working knotty trellis, so with that stitch you should choose your direction of stitching to suit the spiral effect you want.)
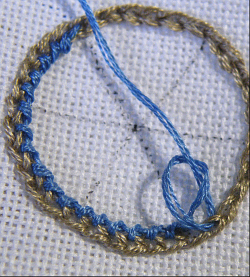 You should make one stitch into every chain of the edge, until you reach the chain where the thread starts: 35 knots. Work the 36th stitch into the thread between the chain and the first stitch.
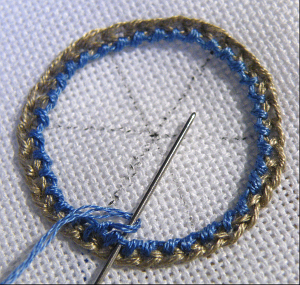 For round two, work one stitch into each bar between pairs of knots in the previous round, and the last stitch into the bar between the last and first knot. You should still have 36 knots.
JOINING IN A NEW THREAD
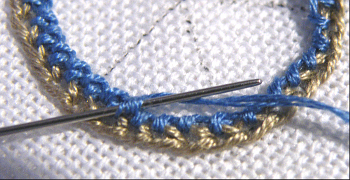 When you need to join a new thread, pass it through the last knot worked with the old thread, as shown. (Don’t tighten the last knot fully until you have taken the new thread through.
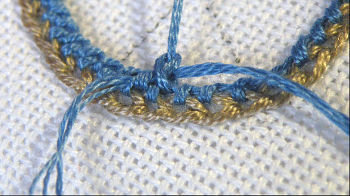 Work the next two or three stitches by picking up the bar between the knots and also picking up the old thread (as with the cording thread in Version 4). The two free ends can then be threaded into the needle and taken through to the back of the work to hide them.
SHAPING THE CIRCLE
Before you start the third round, we need to talk about shaping. To keep the work flat, we’ll be decreasing six stitches in every odd-numbered round after the first round. If we carried on with the same number of stitches in every round, we’d have a tube. (Yes, if you need to make a tube, that’s all you do. Foxgloves? Caterpillar? Trousers?) Increase stitches and the tube flares out (skirts, convolvulus flowers, flared trousers …) If you’ve made shaped objects out of rounds of double crochet (known as single crochet in the US), you’ll already know that flat circles are increased by six stitches every round. But because we’re working inwards from the edge, we’re decreasing six stitches, not increasing. And because the smooth trellis stitches are only about half as high as they are wide, we only do it every other round. (You could decrease three stitches in every round instead, but doing it this way means you only have to think about decreases in every other round.)
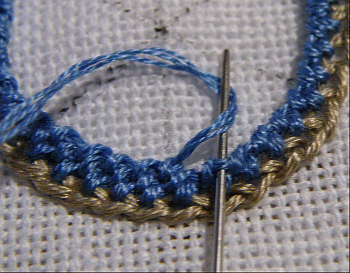 Decreasing is easy – just miss out a bar and work the next stitch into the following bar. If you don’t want to count, use the sector marks to show you where to decrease. In each odd numbered round, skip the bar nearest to each mark.
Let’s get back to the sample. Round three and all odd-numbered rows are worked like round two, except that you make six decreases by skipping six bars.
For round three, work 5 stitches, miss a bar, work five more stitches, miss another bar, etc. You should have 30 knots at the end of it. Round five will have groups of 4 stitches, not 5, making 24 knots; round seven will have groups of 3 stitches and 18 knots in total, etc.
Round four and all even-numbered rows are worked as round two. The number of knots will be the same as in the previous round.
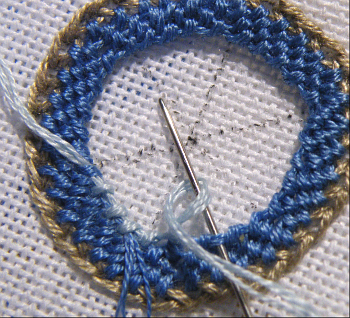 Continue to work like this. Rounds eleven and twelve will each have 6 stitches. After round 12, take the thread through the centre to the back of the work and fasten off. (If the small central hole needs to be hidden, you can make three straight stitches to connect opposite pairs of bars before taking the thread through the fabric.)
TENSION:
If the work starts getting too tight while you are working, work an extra round without decreasing – it depends on your personal stitching tension and how closely spaced your original chain stitches were. If the work gets too loose, you can decrease in two consecutive rows to take up the slack. But a little looseness is not a problem. It is better for the work to be a little loose than a little too tight, so that the ground fabric doesn’t pucker.
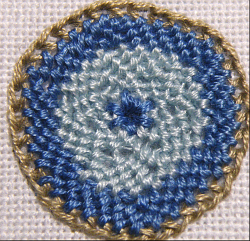 Here is the completed 3mm circle that I worked for the step-by-step photos. This stitching is tighter than it ought to be – it should have had 7 or 8 chain stitches in each sector to look right at that size:
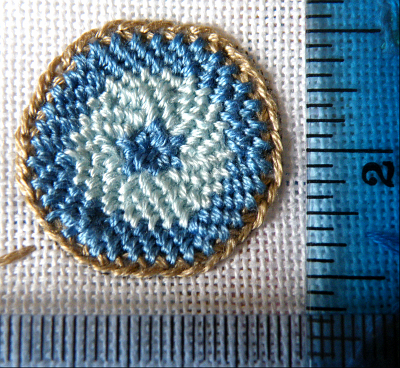 The photo on the right is worked on a 2.5mm circle with 36 chain, exactly as shown in the instructions. Your sample should look like this:
WORKING OTHER SHAPES IN SPIRAL TRELLIS
Ovals are quite easy, once you can work circles. The blue dotted lines on this drawing shows how to space your six decreasing lines. (The wider sectors will need more stitches than the smaller ones.) The centre will close up to an oval opening, rather than a round hole.
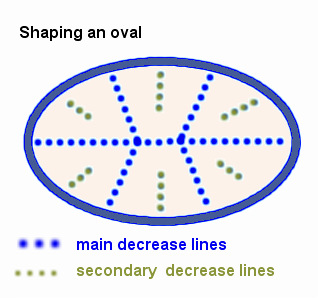 When you have worked enough rounds that the two longest sides are almost touching, work a few trellis stitches along the opening, picking up the bars on both sides of the slit to close the gap. Work these as you worked the stitches to connect the rectangular samples to the top of the chain edge.
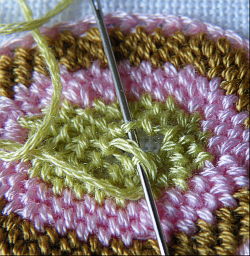 If the shaping starts to look ‘too hexagonal’ stagger the decreases on every other or every third decreasing round: instead of using the main sector lines for decreases, work the decreases of these staggered rounds about halfway between two sectors – where the green dotted lines are on the drawing.
For domed circles (or ovals), worked over padding, try decreasing five or just four stitches in every other round, rather than six. (If you are marking your fabric, remember to only mark that number of sectors.)
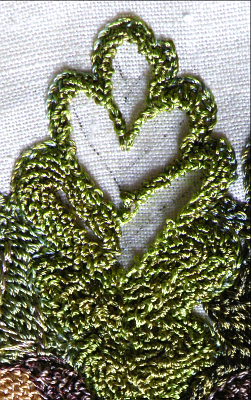 For more complex shapes, you won’t necessarily be working six decreases in every other round. You will need to plan where and when to decrease to suit the shape. You may need to increase in some places – just work two stitches into the same bar. You can shape by eye when you have some experience: just decrease a stitch or two where the knots are getting very close together and add a stitch or two if they are getting too spaced out. This leaf was worked by eye in heart-shaped sections.
If the shapes you are working have to stand free of the ground fabric, you may find a cording thread useful, to give them extra body. You can use metal threads for cording if you want a bit of glitter as well as added strength.


August 7, 2012 at 1:52 am
Showing the difference between smooth and knotty spiral trellis is just brilliant – I had no idea.
” If we carried on with the same number of stitches in every round, we’d have a tube. (Yes, if you need to make a tube, that’s all you do. Foxgloves? Caterpillar? Trousers?) Increase stitches and the tube flares out (skirts, convolvulus flowers, flared trousers …)” gives me a lot more confidence on how these motifs would be done using trellis stitch. Thankyou 🙂
August 7, 2012 at 7:56 am
It is very like shaping in crochet or in DBH, but you need about twice as many rows as you have stitches in each row to make a square section.
January 17, 2015 at 6:05 pm
Thanks for sharing this wonderfull technique.
January 18, 2015 at 9:45 am
Thank you, Magdalena, I hope you find it useful.
July 21, 2017 at 8:22 am
I’m having a problem getting the finished look as dense as your illustration. Keeps ending up lacy. I’m using 2 strand as I think you are. And started out with 30 chain circle just under 1″ diameter but still lacy. Any tips?
July 21, 2017 at 9:06 am
Hi Karen, thanks for asking. I’m using three strands of thread here, not two. I think that makes the difference in openness. (If you want to use two strands or any finer thread, make the chains smaller – you’ll need more of them to make the same size circle, of course. It takes a little experiment to get the chain size to suit the thread size.) Don’t worry too much. Once the circle is well filled, will look more solid.
October 2, 2017 at 4:35 am
in spiral trellis, how do you change threads?
October 2, 2017 at 7:29 am
Thank you for asking, Crystal. You have several options. The one I use is on this page, under “Joining in a new thread”.
You put the tail of the new thread into the last stitch made with the old thread, and tighten the stitch to hold it, leaving a little tail sticking out. You work the first three or four stitches with the new thread over the end of the old thread (as well as into the row below, as usual) to keep that from coming undone. Now you can clip off the rest of the old thread. You can darn in the “starting tail” of the new thread through to the back once the piece is finished, or work over it for a few stitches when you come around to that point again, and clip off any excess.
It’s much easier to do than to explain, once you have done it once!
July 12, 2018 at 10:46 am
It looks superb. I am interested in video link. Even step by step pdf with photo.
Please send me link. Want to learn different stitches . it’s something different. I like it.
July 13, 2018 at 9:21 am
The instructions for this type of stitching start here: https://suetortoise.wordpress.com/embroidery-and-crafts/the-trellis-stitch-family/
If you work through these samples, you can learn the stitches in this family. (I don’t have a video.) It’s a useful group of stitches. Have fun!