Victorian Fun-Fur
Here’s an easy Victorian canvaswork stitch that makes fluffy ridges and furrows like a giant corduroy fabric:

This is worked with #10 double mesh canvas and double knitting yarn, using a suitably sized tapestry needle (size 18 or 20). You’ll also need some spacers. I used thin bamboo barbecue skewers for the photos, you can also use pairs of cocktail sticks. (The original instructions called for strips of thick card. If you want to use card, cut it just wide enough to cover 2 of the meshes. Cocktail sticks or skewers are much easier than card.) You’ll also need small scissors to cut the pile.
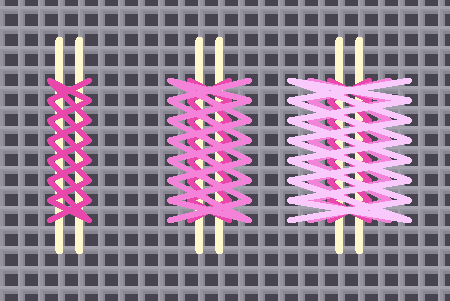
Work close herringbone over a pair of sticks held on the fabric as shown. The sticks cover two threads (with one hole between them) The first row of herringbone takes up the holes nearest to the sticks on each side.
Work a second row of herringbone using the next empty rows of holes, over the first row, and a third row over that. This completes one section. The three rows are shown in dark, medium and light pink on the stitch diagram, for clarity. I’ve used just one colour yarn in the photos, to show the ridges more clearly.

Count three more holes from the outer layer, and then put a pair of sticks over the next two threads. Work the next unit, exactly like the first. Continue working further units in the same way.
The back of the work should look like this:

When you have enough units, take a sharp pair of scissors and cut all the yarn between the sticks, like cutting a pom-pom.

Lift out the sticks. Fluff up the pile, and there you have your Victorian fun-fur stitch.

You can experiment with different colours and see what effects you get, and you can try the stitch with various threads on fabric. You can also work more than three layers of herringbone for more spectacular ridges and furrows – allow two extra holes between the pairs of sticks for each extra layer. You can make the band of fun-fur as deep as you like.
This is a great stitch to teach to children, who really enjoy working it.
I found this stitch in S F A Caulfeild’s Dictionary of Needlework from 1887 (reprinted in two volumes by Dover Books as Encyclopedia of Victorian Needlework) It is in the Supplement, item 271, as “Imitation Fur Borderings for Muff, Collars and Coat Trimmings”. There’s a mistake in the instruction, as it calls for the card strip to be 2½ inches wide, rather than just wide enough to cover two double threads of the canvas and the hole between them. (The picture with the instructions shows the card the correct size. )


July 7, 2013 at 1:53 pm
I might try it. Very like Baggywrinkle. Thank you.
July 7, 2013 at 1:57 pm
Not the same as baggywrinkle in construction. If you can do close herringbone, you can do this one.
July 8, 2013 at 2:40 am
What on earth is Baggywrinkle?
July 8, 2013 at 6:23 am
Spirals of fluffy fringe made from old rope to protect rigging from wear.
July 9, 2013 at 3:42 pm
I think this is the technique used with the Kay’s Practical Embroiderer templates! I didn’t know the Victorians used it, but I shouldn’t be surprised…
July 9, 2013 at 5:35 pm
I think the Practical Embroiderer was early 20th century, not Victorian. Yes, it was very much the same idea of stitching over a form and then cutting it free to leave tufts of yarn on the fabric. When I was a small child, I am sure I was shown a set of these devices (they had probably belonged to my grandmother). I couldn’t figure out how they worked, not realising they were for making tufted shapes – there were no instructions. No doubt they went to a jumble sale.
October 20, 2014 at 4:17 pm
Your blog is new to me Sue…I found it on Needlepoint-for Fun website. I’m new to needlepoint having completed only 1 piece so far but working on another 3! This is such a wonderful stitch technique to add to one’s growing list, and I love that it was used during the Victorian era.
October 20, 2014 at 5:00 pm
I’m glad you like the stitch, Denise. And thanks for commenting – so few visitors bother to give me any feedback. Good luck with your adventures in needlepoint. I use simple needlepoint stitches to create my stitched boxes – you’ll find some pages about them on this blog – maybe they will give you some more ideas for things you can make with your new skills.
December 17, 2014 at 11:23 pm
Amazing! I have been looking for directions and info on exactly *how* to do “turfing” or making chenille by hand. Not the quilting kind of chenille , the lovely vintage 1920’s -1960’s kind. This may be how some of it was done. Not sure how you’d curve this, though. Thanks for the great visuals!
December 18, 2014 at 8:57 am
There were several ways of making fluffy stripes and shapes: tufted candlewicking, bias-cut fabric stitched and frayed, the Practical Embroiderer metal templates, turkey work and velvet stitch… Plus there were gadgets similar to modern punch needles.
February 18, 2015 at 2:56 pm
I love this! I still needlepoint the old fashioned way and haven’t really dared to incorporate fancy stitches in my pictures. I’m currently working on Klimt’s, Tree of Life. Any suggestions?
February 18, 2015 at 6:48 pm
You might want to get hold of a book showing a good range of canvas embroidery stitches, Bridget. Try some of them out for yourself and see if you get inspired. All those curves on the Klimt picture make me think I might want to work something that is very flexible, like chain stitch or stem stitch over the outlines of the tree (after doing the needlepoint) in a fairly fine yarn, to make the edges look smooth, not stepped. Or do the outlines with gold metallic thread, couched down. You could use a wide variety of fancy stitches for the individual motifs on the tree, so that they stand out from the plain tent stitch background. Again, you could add some metal thread to those motifs – and beads. That picture would be a very good project for experimenting a bit as it would be very ‘forgiving’ of changes. Follow your instincts, make it your own – and have fun with it.
December 25, 2015 at 10:07 pm
I’m pretty inexperienced, and cannot see how the stitches are sufficiently anchored to stay in place.
December 25, 2015 at 11:00 pm
Hi Sandra. Provided that the yarn is thick enough to fill the hole in the mesh, the stitches stay in place quite well. (I was quite surprised, myself.) It’s possible to pull the tufts out, but once they’re well fluffed up, they are fairly secure. This isn’t a technique for items that will be laundered or get heavy wear, though, it’s a ‘novelty’ stitch.
The Victorians often used embroidery paste on things of this type; you could always paint a thin layer of craft glue on the back of the stitches when the work is finished, to make sure the pile stays put.
September 10, 2016 at 12:32 pm
Thank you a thousand times for mentioning Kay’s Practical Embroiderer. My Mum (80) has discussed something very similar to this many times, as something she did as a girl with her grandmother, and has often bemoaned the fact she could not remember what it was called or what happened to them. I have managed to track down a set and they will be part of her birthday gift. I know she will be delighted with them. So thank you very much again.
September 10, 2016 at 12:41 pm
Glad to be of help, Kathy! I’ve seen quite a few sets of Practical Embroiderer templates on eBay recently. I hope your Mum has a lovely birthday.
December 7, 2016 at 1:03 am
The pattern looks interesting, but what does one do with the fun fur? Is this used as part of a pattern or does one cut it off the canvas for use elsewhere?
December 7, 2016 at 7:59 am
The book it is in shows strips of it used to trim the collar and cuffs of a child’s coat, and the edges of a matching muff. So I guess it was intended to be applied to other things.
October 22, 2017 at 3:36 pm
Hi so if I follow your picture how to do it the back will be the same as yours .
Is there any other method other than the hoek and knot system .
I’m going to try your method
Regards
Vivienne
October 23, 2017 at 7:01 am
Hi Vivienne! The back of your canvas should look like mine if you follow the instructions.
If you want other canvas-work stitches that make a raised pile, like a rug, try searching online for Velvet Stitch or Turkey Work. Both of these are more useful than this stitch.
October 22, 2017 at 7:01 pm
Hi do you have a video to make this item
October 23, 2017 at 7:02 am
No, I don’t have videos.
December 6, 2017 at 11:34 pm
I need a tutorial because I can’t follow the stitches to know where to pit the needl in which holes
December 7, 2017 at 11:05 am
It’s three rows of closed herringbone stitch worked over the sticks, Domestic. The first row is worked as close as possible the sticks, then a second over the first using the next closest holes and a third row over the first two. I can’t explain it better than that, and I think the diagram shows the three rows clearly. If you don’t know closed herringbone, it is just herringbone stitch worked with the stitches next to each other, not spaced out. (It’s the reverse side of double back stitch, too.) You’ll find it in most good stitch dictionaries. Mary Corbet has a page that will help you, worked on fabric without sticks, but the same stitch. https://www.needlenthread.com/2013/07/stitch-fun-victorian-tufting-fluffy-stuff.html
April 23, 2018 at 6:37 pm
Excellent! Very nice stitch and very clear explanation. I just hope to do a good job. Thank you
April 23, 2018 at 10:00 pm
Thank you, Maria. Have fun with this stitch.
April 12, 2019 at 5:46 pm
[…] stitches to turn into fields and gardens, I came across a post describing how to make “Victorian Fun-Fur“. Only instead of giant corduroy ridges, I immediately saw fields with carefully cultivated […]
April 12, 2019 at 6:06 pm
Delighted to see that this technique is going to be part of an amazing craft project for Dublin Worldcon.
August 20, 2019 at 8:16 pm
I have always been fascinated by a pillow that my mother had. I don’t think I can correctly describe it but I will try…….. I was made out of squares of tufting which was cut but then it was subcut, as far as I could see so that looking from the top the it became a four sided figure looking like a pyramid. It was made from two contrasting coloursand it looked like the tufting over the sticks changed direction to make the squares. My mother made the pillows but couldn’t recall how it was done. She would have made this in Austria-Hungary. If you have any info please help. Thank you in advance and I must say I have really enjoyed finding this web site.
Llynnda
August 20, 2019 at 9:56 pm
Thank you for telling me about this cushion, Llynnda. I’m intrigued. I don’t think I have ever seen tufting or candlewicking worked exactly like this, but there were quite a few different methods of making tufts: some stitched over sticks or metal shapes (like Kay’s Practical Embroiderer) and some using tools like large punch needles that pushed loops of yarn through from the back of the fabric. The loops could be left as loops or cut to make tufts. I wonder if any other reader can help identify your mother’s cushion technique? That would be great.
April 30, 2020 at 9:15 pm
Hi Sue! I just came across your page and I just wanted to say THANK YOU! I absolutely love your passion and willingness to share. Love reading the history and details that you provide in your post. You have made me recall so many stitches, etc additionally have learned quite a bit lol Now on to the fun part of continuing to explore ALL your post! Be well! Hugs from California!
April 30, 2020 at 9:24 pm
Thanks. Glad you are enjoying the blog, Audrey. I love finding things out and working out how to do things. Happy stitching from Shropshire, England!
November 19, 2020 at 11:17 pm
Exelente y muy lindo trabajo.
Me gustaría que estuviera en español.
December 27, 2020 at 1:22 pm
I need to try this out
September 22, 2022 at 11:39 am
I’m german and have an sampler of Berlin Woolwork woreked around 1880 – 1900 with different flowers worked in this chenille stitch. I’ve always wondered how to archive this.
Thank you very much for sharing!